


 ChatGPT
 Gemini
 AI Overviews
 Perplexity
 Claude


 You
 Origin Investments
 Ashcroft Capital
Every article Verand writes has a hero image at the top and, further down, images between sections. Brand Hub → Visual Guidelines is where you decide how those look, and whether Verand makes the hero at all.
The tab also holds your Logo Variants, Brand Colors, Fonts and Type Scale. Add your brand colours first: the body image picker offers them as accents.
Who makes the hero
At the top of Hero image templates there's a Hero images switch:
- Generate for me (the default): Verand draws a hero for each new article.
- I supply my own: new articles arrive without a hero, and you add yours on the brief or in the editor. You can still generate one for a single article from either place.
Auto or a template
Below the switch is a row of cards. The one carrying the Default pill is what new articles use; click Set default on another card to switch.
Auto needs no template: the style comes from your industry, audience, region and accent colours, with a scene worked out for each article.
A template makes every hero match reference images you upload, with a new subject each time. You can keep up to five. Click New template to start one. It takes two steps, and changes save automatically.
Step 1, References. Give it a Template name. That's only for you; it's never sent to the image model. Then choose Match my reference images, or Match my reference images, plus my own rules, which adds a Rules for this template box for things every hero must always or never include, such as "Logo top left. No people."
Upload up to four reference images. Two or three consistent images beat one perfect one, and images that disagree with each other produce heroes that match none of them.
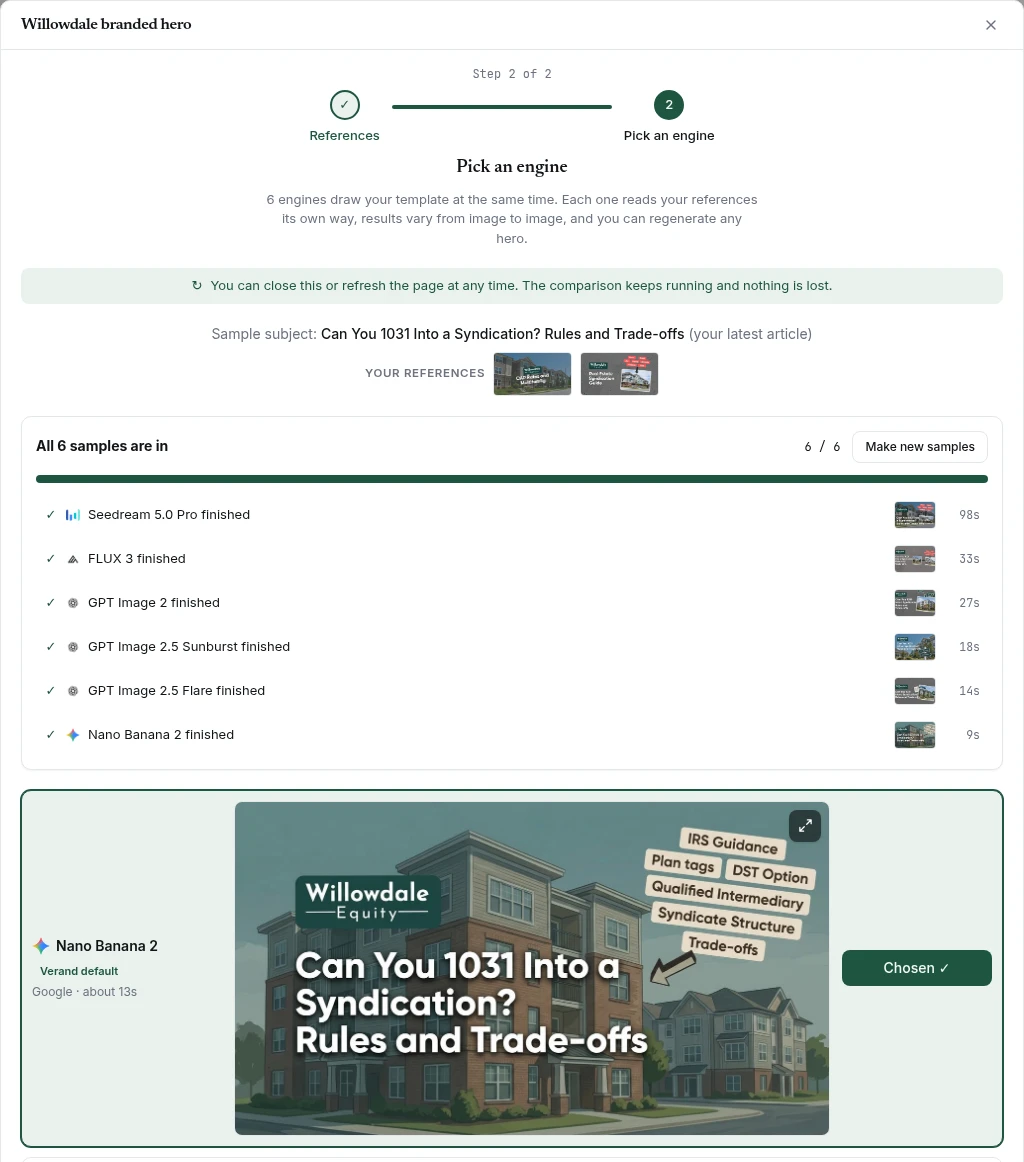
Step 2, Pick an engine. Click Next: pick an engine, then Start comparing. Six image engines (one from Google, three from OpenAI, one from ByteDance, one from Black Forest Labs) each draw your template once, at the same time. The subject is a real title: your latest article, else a post from your blog, else your business name. It takes about a minute and a half, and you can close the pop-up or refresh the page meanwhile. The template card shows Comparing, then Finish › Pick an engine when the samples are in.
Click a sample to see it full screen, then Use this engine on the best match. Choosing an engine also makes that template your default. If you never choose, the template uses Google's engine, marked Verand default. Make new samples runs it again, up to six comparisons per site in 24 hours.
Results vary from image to image on any engine, so you can always regenerate a hero. If your chosen engine can't draw one, Verand falls back to Google's engine and then OpenAI's, so the article isn't left without a hero. The engine choice applies to that template only: Auto heroes and body images use Google's engine, with OpenAI's as the backup.
Body image style
The Body Image Style card sets the look of the pictures between sections:
- Auto: editorial photography, tuned to your industry, audience and region.
- Styled: opens a picker, and only changes your setting once you save.
The picker groups nine styles. Reads as credible: Photographic (marked Recommended), Line art, Isometric. Reads as friendly: Illustration, Flat vector, Watercolor, Sketch. For ideas, not scenes: 3D render, Abstract. Then set an Accent colour (up to two of your Brand Colors, used as a light accent, never a fill), People (No people, At a distance, or Hands and details only), Mood (Warm, Neutral or Cool) and, if you like, Anything else.
Faces, readable text and logos are kept out of every image whatever you choose. The style applies to new articles.
The match suggestion. When your default hero template is in a different style from your body images, the card offers to match them, naming the template and the style it found. Click Use to switch, or Not now to dismiss it. Auto is photographic, so a photographic template never triggers it.
Choosing per article on the brief
Each brief has a Hero image section: Generate, Upload now or I'll add it later. It starts on your Brand Hub setting, and a pick here applies to that article only, saved as soon as you click. Use Brand Hub setting puts it back.
- Generate: drawn in your Brand Hub hero style.
- Upload now: a JPG, PNG, WebP or GIF up to 8 MB, with alt text. Wide (16:9) images fit best. Nothing is generated or charged.
- I'll add it later: the article arrives without a hero. The Report Card's Hero image present check flags it until you add one.
Once the article is written, the section locks and you change the hero in the editor.
The hero in the editor
Open the article and go to the Hero tab.
With a hero, you get Edit alt, Regenerate and Upload your own. The hero on the page also has a Replace button that opens the same upload panel. If you upload without alt text, Verand asks for it straight after.
Regenerate opens the Regenerate Image pop-up. Under Style, pick Auto or any template with images; your default is marked. Click Regenerate for a fresh image of the same scene, or describe a new one under Prompt what image you'd like and click Generate from prompt. A template on a slower engine can take a minute or two.
Without a hero, the tab offers Use brand default, Auto. Let AI decide, Write my own prompt and Upload your own.
When Verand publishes to WordPress, the hero becomes the post's featured image.